Clean Architecture: TypeScript Express API
By employing clean architecture, you can design applications with very low coupling and independent of technical implementation details. That way, the application becomes easy to maintain and flexible to change. Clean architecture allows us to create architectural boundaries between dependencies which allows components to be swapped in and out and be intrinsically testable.
What’s to follow is our attempt to build an API using a clean architecture. The API will be used to manage and organize contacts. We’ll use TypeScript
Setup Project
Create a folder and initialize it.
$ mkdir contacts-api
$ cd contacts-api
$ npm init -y
We’re going to need a few packages.
$  npm i express
$  npm i -D typescript ts-node @types/node @types/express supertest @types/supertest @types/node jest @types/jest ts-jest
Here we’re adding the TypeScript system, the Jest test framework and Express, along with type definitions for node, express and jest.
Configuration of system code
Next, we have to create a tsconfig.json file. The tsconfig.json file specifies the root files and the compiler options required to compile the project. We use the “tsc” command to do that for us.
$ npx tsc --initFor our system we’re only going to adjust two options — “outDir” (where to put the compiled Javascript) and “rootDir” (where the source code lives):
"outDir": "./lib",
"rootDir": "./src"
Configuration of test environment
Let’s set up our test environment. Because we’re going to use TypeScript while writing tests, we will run TypeScript in a precompiled way using ts-jest.
ts-jest is a TypeScript preprocessor with source map support for Jest that lets you use Jest to test projects written in TypeScript Let’s initialize jest for TypeScript testing
$ npx ts-jest config:initA jest.config.js file will be created and should look like this:
module.exports = {
    preset: "ts-jest",
    testEnvironment: "node"
};
Finally, let’s add a script to the package.json file and to and watch all tests. Monitoring of code coverage is useful as well:
...
"scripts": {
    "test": "jest --watchAll --collectCoverage",
...
And that’s it for project setup and configuration. Let’s start looking at the application now.
The Plan
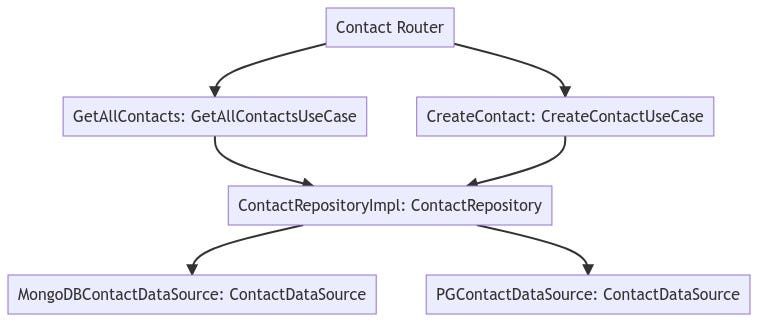
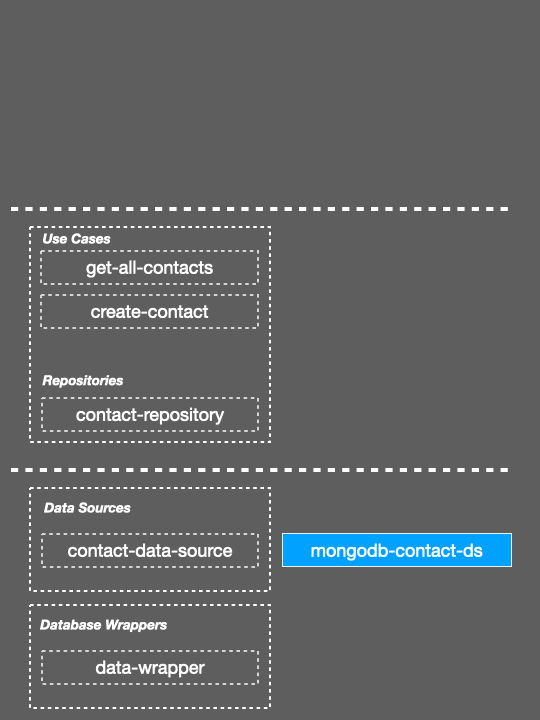
At a high level, we’d like our API to be structured in the following way
Folder Structure
Let’s use files and folders to structure our application. Doing this allows us to communicate architecture intent:
/src
│── main.ts
│── server.ts
│── presentation
│ └── routers
│ └── contact-router.ts
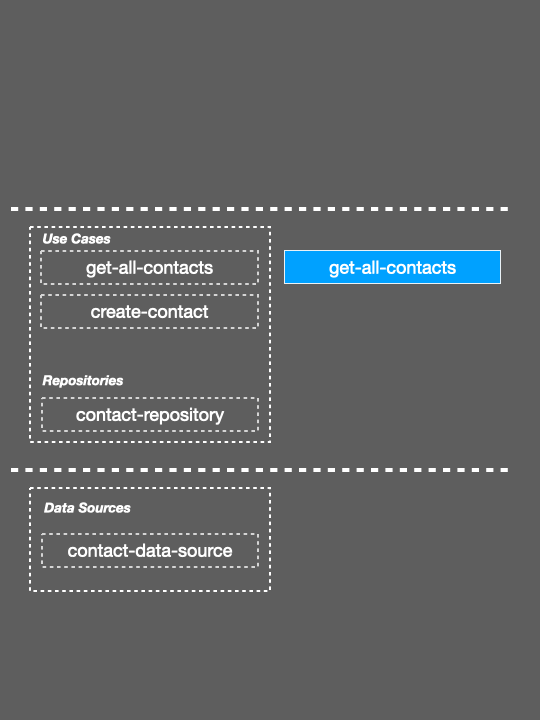
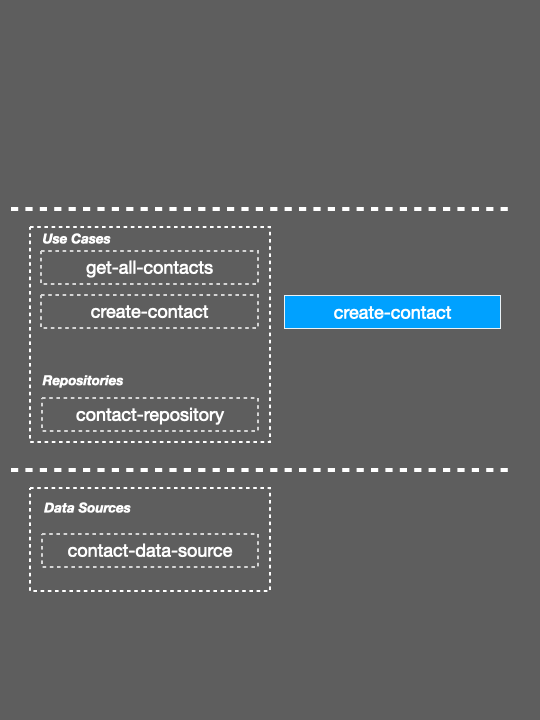
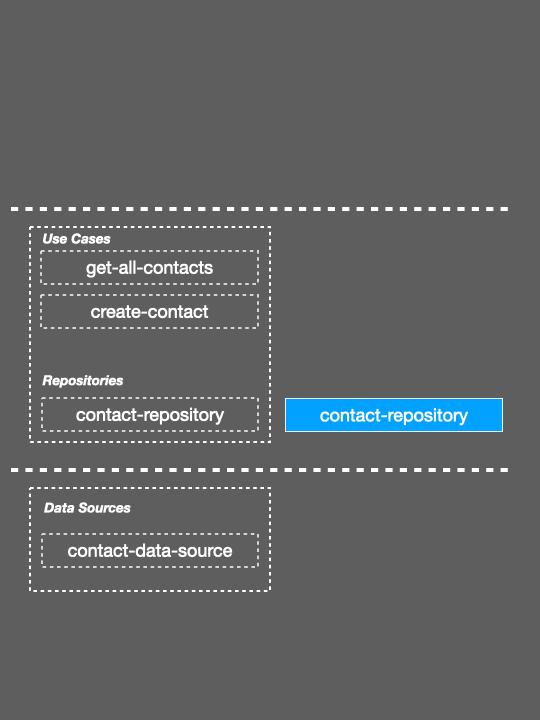
├── domain
│ ├── interfaces
│ │ ├── repositories
│ │ │ └── contact-repository.ts
│ │ └── use-cases
│ │ └── contact
│ │ ├── get-all-contacts.ts
│ │ └── create-contact.ts
│ ├── entities
│ │ └── contact.ts
│ ├── repositories
│ │ └── contact-repository.ts
│ └── use-cases
│ └── contact
│ ├── get-all-contacts.ts
│ └── create-contact.ts
└── data
├── interfaces
│ └── data-sources
│ ├── database-wrapper.ts
│ └── contact-data-source.ts
└── data-sources
└── mongodb
├── models
│ └── contact.ts
└── mongodb-contact-data-source.tsThe presentation layer would mainly be used for inputting and outputting user data (API routes).
The inner core domain layer holds all business logic (use cases, repositories).
The data layer holds all infrastructure implementations (data sources).
For each layer, we define the interfaces under an interfaces folder
Let’s start with the domain:
Contact Entity
export interface Contact {
    id?: string;
    email: string;
    firstName: string;
    surname: string;
}
Contact repository interface
import { Contact } from "../../entities/contact";
export interface ContactRepository {
    createContact(contact: Contact): Promise<boolean>;
    getContacts(): Promise<Contact[]>;
}
GetAllContacts use case interface
import { Contact } from "../../entities/contact";
export interface GetAllContactsUseCase {
    execute(): Promise<Contact[]>;
}
CreateContact use case interface
import { Contact } from "../../entities/contact";
export interface CreateContactUseCase {
    execute(contact: Contact): Promise<boolean>;
}
Note about TDD:
TDD should be done by writing tests first, however, for easy illustrative reasons we’ll show code then tests
Router
Now that we have all interfaces for the domain in place let’s write our router middleware code:
Router Code:
As params of the ContactRouter function, we pass instances of the use cases into the router.
In our tests, we’ll be using Supertest to test the API endpoints of GET /contact and POST /contact. So before we run our tests let’s create an API server. Within our tests, we will then bind the contact router to the /contact path
Router Tests:

Now that we’ve completed all tests and code for the router, it’s time to move on to the use cases
Use Cases
Use cases have one or more repository dependencies and will be constructor injected. Use cases are structured in a way that each use case has one method, the execute method, which holds all business logic for that use case.
Use Case Code:
Use Case Tests:
Repository
The main purpose of the repository is to know and marshall data sources and services. The contact repository has a data source dependency.
Let’s define how this data source should behave by creating a data-source interface
import { Contact } from "../../../domain/entities/contact";
export interface ContactDataSource {
    create(contact: Contact): Promise<boolean>;
    getAll(): Promise<Contact[]>;
}
Now that we have our data source interface let’s create the contact repository
Repository Code:
Repository Tests:
Time for us to think about the data source. We’ll be using MongoDB so let’s install MongoDB
$ npm i mongodb
$ npm i -D @types/mongodb
As you’ll see the database technology doesn’t matter. We’ll build a wrapper around the mongo’s database operations we’re interested in.
Database Interface
export interface DatabaseWrapper {
    find(query: object): Promise<any[]>
    insertOne(doc: any): Promise<any>
}
MongoDBContactDataSource Code
MongoDBContactDataSource Test
Application
We’re done with all tests and code and they report 100% code coverage

Finally, to get the application up and running we need a main.ts to wire up all components:
Main code
Here we
- Create a MongoDB contact database,
- Inject all dependencies into the contact router
- Bind the contact router to the “/contact” path
- Listen on port 4000.
To compile and run the application we need to add the following scripts to our package.json file
...
"scripts": {
    "test": "jest --watchAll --collectCoverage",
    "dev:build": "tsc",
    "dev:serve": "nodemon -e js -w lib lib/main.js"
},
...
Compile by running “npm run dev:build”
Then run the application by running “npm run dev:serve”
I’ve gone further to create the PGContactDataSource and updated the main.ts to illustrate how we can interchange data sources
Conclusion
Creating an application in a cleanly structured way allows us to progressively test and develop parts of the application by creating architectural boundaries with interfaces. Not only can we create pluggable parts but those parts to be mocked during testing.
Github Repo : https://github.com/nanosoftonline/clean-architecture-express-contacts