Webpack: Managing JavaScript and CSS Dependencies
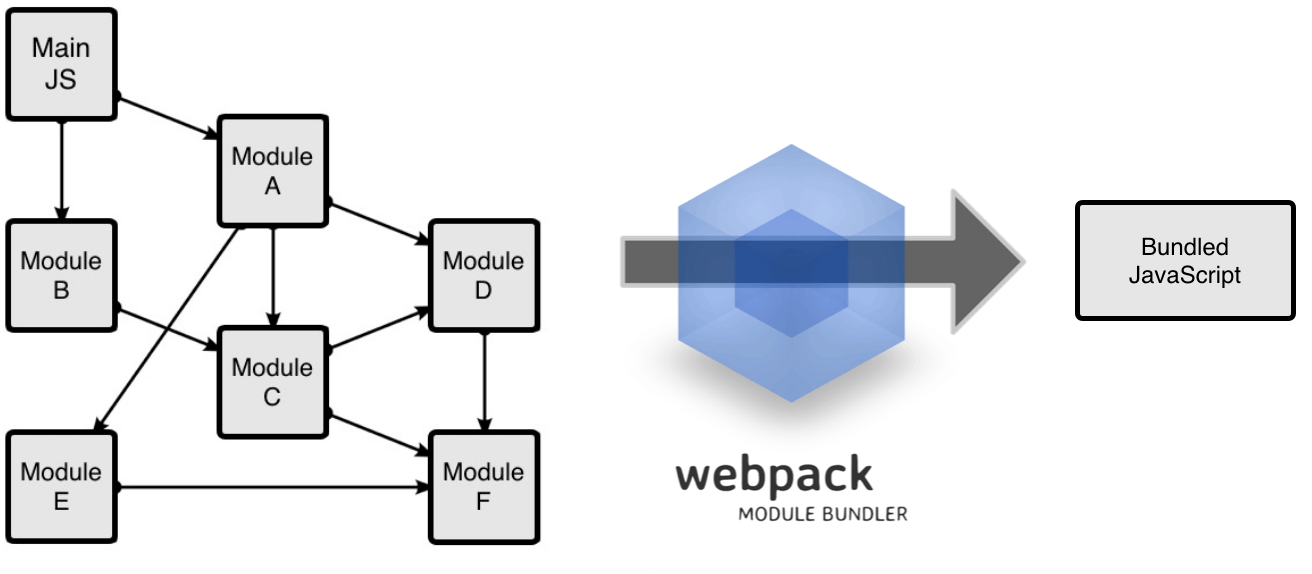
Webpack is a build tool to manage your dependencies (css, js, etc.). But why do we need it when we can just add js and css to our html file like the following:
For an application of this size, we don’t need to manage the dependencies of js and css, however as your application grows we’ll need to keep track of many file dependencies and their loading order. Additionally, code minification is not implemented. So let’s improve our dependency management by using webpack.
After we npm init your project, we install webpack
$npm init
$npm i -D webpack
let’s add a build script in our package.json file
Here we specify the entry file for webpack to work it’s way through the dependency tree. Starting at app.js webpack will merge all the code into one bundle file, here called bundle.js. In the files we need to use “import” and “export” to show dependencies. First lets start with the app.js file
This shows that the app.js file has a dependency on first.js. Let’s take a look at the first.js file
The file exports one function called handleClick. We can now execute the webpack script
$npm run build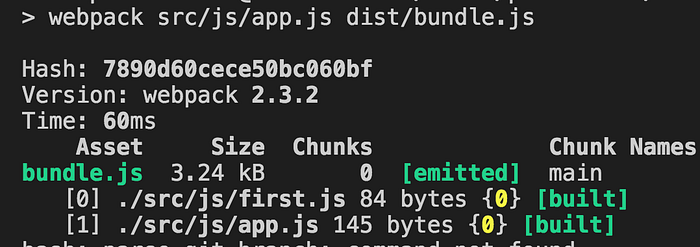
As you can see, webpack builds and creates the bundle.js. You should have a file structure as follows
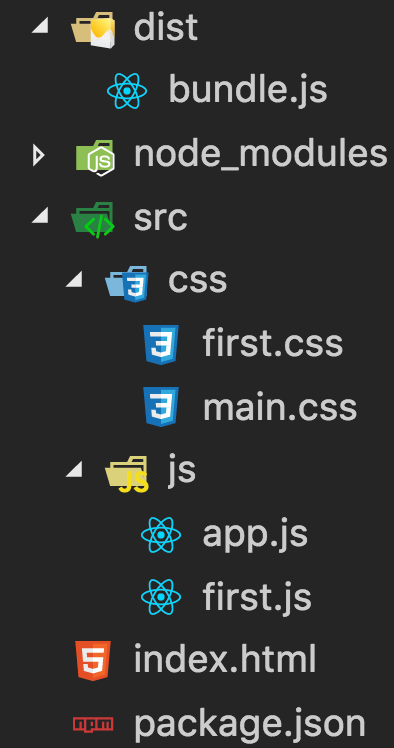
We now remove the js files and replace them with one bundle file
Webpack-Dev-Server
In the previous section we used the file protocol to render the page in our browser. We shouldn’t be doing this. We need a web server to render the page. So let’s install webpack-dev-server. What is webpack-dev-server? It’s a little express server which wraps around webpack and all it’s functionality. Let’s install webpack-dev-server.
@npm i -D webpack-dev-serverWe then need to change the build script to use webpack-dev-server
Let’s run the script again and notice that the page is now hosted on http://localhost:8080. Also we can now delete the dist folder which includes the bundle.js file and the application will still work because webpack-dev-server builds the bundle.js file and puts it into memory. This is quite handy when because if any file which is part of the dependency tree is changed, webpack-dev-server automatically rebuilds the bundle file and reloads the application.
Webpack Config File
To fully exploit the power of webpack we need a config file. A config file will instruct webpack what to do with our source files. Create a “webpack.config.js” in the root of the project
Before we run the build script we need to remove the options from the build command because the build will now be using the config file to instruct webpack what to do. The new package.json should be as follows:
Loaders and Plugins
The real power of webpack is in the loaders and plugins that webpack gives you access to.
Loaders are tasks that are applied on a per file basis and run when webpack is building your bundle. A typical task would be preprocess a sass file into css and load the output into the head section of our html file.
Plugins are is a process applied on your bundle before it is sent to the output file. A typical plugin is the minification plugin.
To illustrate loaders and plugins lets remove all reference to css files from our index.html and import the css file from our entry file (app.js). For this we need a few loaders and plugins do that transformation. For this case we need two loaders and one plugin: “css-loader”, “style-loader” and “extract-text-webpack-plugin”
$npm i -D css-loader style-loader extract-text-webpack-pluginWe now need to tell webpack to use these loaders with analyzing css files
What this will do is allow webpack take all css file imports and merge it into a bundle called “bundle.css”.
We can now remove the css file links from the index.html page and replace it with a single link to the bundle.css file.
We now have all css and js dependencies managed and processed by webpack.
To implement an additional sass loader we do the following
As you can see we’ve changed the paths of the bundles to dist/css/bundle.css for css and dist/js/bundle.js. Finally, we have to adjust the index.html accordingly